Flange Face Finish
Flange Face Finish
Flange face finish
The ASME B16.5 code requires that the flange face (raised face and flat face) has a specific roughness to ensure that this surface be compatible with the gasket and provide a high quality seal.
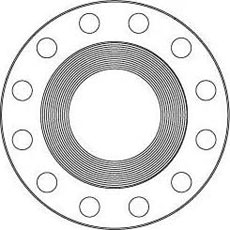
A serrated finish, either concentric or spiral, is required with 30 to 55 grooves per inch and a resultant roughness between 125 and 500 micro inches. This allows for various grades of surface finish to be made available by flange manufactures for the gasket contact surface of metal flanges.
The picture shows a serrated finish on a Raised Face.

The most used Surfaces
Stock Finish
The most widely used of any flange surface finish, because practically, is suitable for all ordinary service conditions. Under compression, the soft face from a gasket will embed into this finish, which helps create a seal, and a high level of friction is generated between the mating surfaces.
The finish for these flanges is generated by a 1.6 mm radius round-nosed tool at a feed rate of 0.8 mm per revolution up to 12 inch. For sizes 14 inch and larger, the finish is made with 3.2 mm round-nosed tool at a feed of 1.2 mm per revolution.
Spiral Serrated
This is also a continuous or phonographic spiral groove, but it differs from the stock finish in that the groove typically is generated using a 90-° tool which creates a “V” geometry with 45° angled serration.
Concentric Serrated
As the name suggests, this finish is comprised of concentric grooves. A 90° tool is used and the serrations are spaced evenly across the face.
Smooth Finish
This finish shows no visually apparent tool markings. These finishes are typically utilized for gaskets with metal facings such as double jacketed, flat steel and corrugated metal. The smooth surfaces mate to create a seal and depend on the flatness of the opposing faces to effect a seal. This is typically achieved by having the gasket contact surface formed by a continuous (sometimes called phonographic) spiral groove generated by a 0.8 mm radius round-nosed tool at a feed rate of 0.3 mm per revolution with a depth of 0.05 mm. This will result in a roughness between Ra 3.2 and 6.3 micrometers (125 – 250 micro inch).

Remark(s) of the Author…
SMOOTH FINISH
Is it suitable for spiral gasket and non metallic gasket?
For what kind of application is this type?
The above questions are often asked. I try to give a correct answer.
Smooth finish flanges are more common for low pressure and/or large diameter pipelines and primarily intended for use with solid metal or spiral wound gaskets.
Smooth finishes are usually found on machinery or flanged joints other than pipe flanges. When working with a smooth finish, it is important to consider using a thinner gasket to lessen the effects of creep and cold flow. It should be noted, however, that both a thinner gasket and the smooth finish, in and of themselves, require a higher compressive force (i.e. bolt torque) to achieve the seal.
You may have probably seen this comment:
Machining of gasket faces of flanges to a smooth finish of Ra = 3.2 – 6.3 micrometer
(= 125 – 250 microinches AARH)
AARH stands for Arithmetic Average Roughness Height. It is used to measure the roughness (rather smoothness) of surfaces. 125 AARH means 125 micro inches will be the average height of the ups and downs of the surface.
63 AARH is specified for Ring Type Joints.
125-250 AARH (it is called smooth finish) is specified for Spiral Wound Gaskets.
250-500 AARH (it is called stock finish) is specified for soft gaskets such as NON Asbestos, Graphite sheets, Elastomers etc. If we use smooth finish for soft gaskets enough “biting effect” will not occur and hence the joint may develop leak.
Sometimes AARH is referred also as Ra which stands for Roughness Average and means the same.